Cubase, a name synonymous with professional music production, has shaped the soundscapes of countless artists across genres. From its humble beginnings as a pioneering DAW, Cubase has evolved into a powerful and versatile tool, boasting a rich history of innovation and a constantly expanding feature set. This exploration dives into Cubase’s core functionalities, advanced techniques, and its enduring impact on the music industry, comparing it to other popular DAWs and offering insights into maximizing its potential.
We’ll journey through Cubase’s evolution, examining its major version updates and UI transformations. We’ll then delve into its powerful MIDI and audio editing capabilities, exploring workflows for crafting everything from intricate orchestral scores to driving electronic beats. Comparisons with other popular DAWs like Ableton Live and Logic Pro X will highlight Cubase’s unique strengths and help you determine if it’s the right tool for your creative vision.
Finally, we’ll cover advanced techniques, plugin management, and optimization strategies to help you unleash Cubase’s full potential.
Cubase’s History and Evolution

Cubase, a name synonymous with Digital Audio Workstations (DAWs), boasts a rich history spanning decades. Its evolution reflects the broader technological advancements in music production, from its humble beginnings as a MIDI sequencer to its current status as a powerful, multifaceted tool for composing, recording, editing, and mixing audio. This journey is marked by significant version updates, each introducing groundbreaking features that shaped the industry landscape.
Cubase’s development started in the mid-1980s, a time when personal computers were still finding their footing in the professional music world. The initial versions were primarily focused on MIDI sequencing, offering a relatively basic yet innovative platform for composing and arranging music. As technology progressed, so did Cubase, incorporating increasingly sophisticated audio capabilities, advanced editing tools, and an ever-evolving user interface.
Major Version Updates and Feature Additions
Tracking the evolution of Cubase through its major version releases reveals a fascinating story of technological innovation and user-driven improvements. Each significant update introduced new features, often responding to industry trends and user demands. These enhancements not only improved workflow but also expanded the possibilities for musical creativity.
- Cubase 1 (1989): This initial release focused primarily on MIDI sequencing, offering basic capabilities for composing and arranging music. The interface was rudimentary compared to modern standards, but revolutionary for its time.
- Cubase VST (1999): This version marked a pivotal moment, introducing the VST (Virtual Studio Technology) plugin standard. This allowed third-party developers to create and integrate a wide array of virtual instruments and effects, drastically expanding Cubase’s functionality and transforming the landscape of music production.
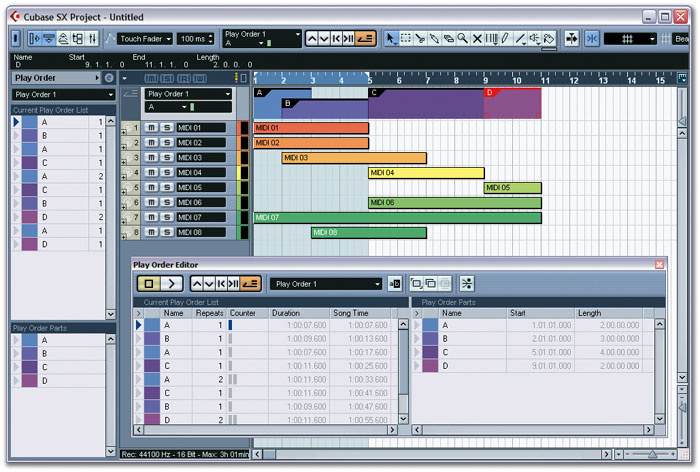
- Cubase SX (2003): The SX series brought significant improvements to the workflow, introducing a more intuitive interface and advanced audio editing tools. Features like non-destructive editing and improved automation capabilities were key additions.
- Cubase 5 (2006): This version refined the interface further and included notable additions such as the improved VariAudio pitch correction tool and enhanced MIDI editing capabilities.
- Cubase 11 (2020): Recent versions have focused on enhancing collaboration tools, improving performance, and adding sophisticated features such as the sophisticated score editor and advanced mixing capabilities. The user interface continues to evolve toward greater customization and efficiency.
Cubase User Interface Evolution
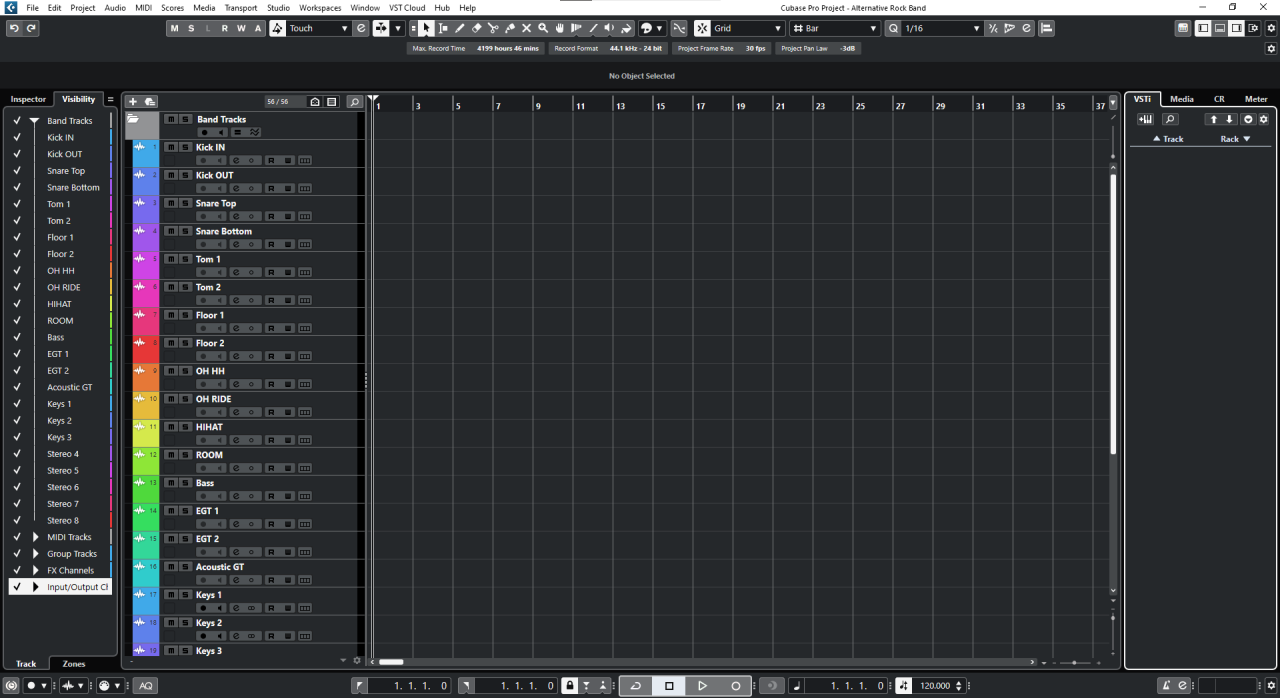
The evolution of Cubase’s user interface is a clear reflection of the changes in computing technology and user expectations. Early versions presented a comparatively simple, text-based interface, while modern iterations offer highly customizable and visually rich environments.
Imagine the stark difference between the initial, almost purely text-based interface of Cubase 1, with its limited visual feedback, and the highly graphical, customizable workspace of Cubase 12. Early versions prioritized functionality over aesthetics, while the modern iterations emphasize both, providing users with a visually appealing and efficient workspace.
Comparison of Early and Latest Cubase Versions
The functional gap between early Cubase versions and the latest iterations is vast. Early versions primarily handled MIDI sequencing, offering limited audio capabilities and basic editing functions. Modern versions, on the other hand, are full-fledged DAWs capable of handling complex audio and MIDI projects, incorporating advanced editing tools, sophisticated effects processing, and comprehensive mixing capabilities. The difference is akin to comparing a simple typewriter to a powerful word processor with advanced formatting and collaborative features.
Early versions were groundbreaking for their time, but today’s Cubase offers an unparalleled level of power and flexibility for music production.
Core Features and Functionalities

Cubase, a Digital Audio Workstation (DAW) powerhouse, boasts a comprehensive suite of tools for music production, from basic recording to complex orchestral arrangements. Its strength lies in its intuitive interface and powerful features, making it accessible to beginners while offering advanced capabilities for seasoned professionals. This section delves into the core functionalities that make Cubase a top choice for musicians worldwide.
MIDI Editing Capabilities and Workflow
Cubase’s MIDI editor is renowned for its flexibility and precision. It allows for detailed manipulation of MIDI data, including note editing, velocity adjustments, automation, and much more. The workflow is highly customizable, allowing users to tailor their environment to their specific needs. For instance, users can utilize piano roll view for visual note input and editing, or utilize the score editor for a more traditional notation approach.
Advanced features like the Chord Track simplify complex harmonic progressions, while the powerful quantize function helps to clean up timing imperfections. These features, combined with the ability to create and manipulate MIDI controllers, give users unparalleled control over their virtual instruments and synthesizers. A common workflow involves sketching out a melody in the piano roll, then refining the timing and articulation using various editing tools, before finally adding harmony and rhythmic complexity through the Chord Track and other MIDI editing functions.
Creating a Complex Orchestral Arrangement in Cubase
Creating a complex orchestral arrangement in Cubase involves a multi-stage process leveraging its extensive features. First, the composer would typically begin by sketching out the basic melodic and harmonic structure, often using MIDI instruments to represent the various orchestral sections. Next, they would refine the individual instrumental parts, using the MIDI editor to adjust note velocities, add articulation, and create expressive phrasing.
Cubase’s powerful mixing capabilities would then be employed to balance the individual instruments within the overall mix. This involves using EQ, compression, and other effects to shape the sound of each instrument and create a cohesive sonic landscape. Finally, the arrangement would be rendered to audio, allowing for further audio editing and mastering to achieve the desired final product.
For example, a composer might use the score editor to create a detailed orchestral score, then export the MIDI data to individual instrument tracks, allowing for detailed editing and fine-tuning of each part. The use of VST instruments, which emulate the sound of real orchestral instruments, is crucial in this process.
Audio Editing Tools and Applications
Cubase’s audio editing capabilities are just as robust as its MIDI features. Tools like the VariAudio editor allow for precise pitch and timing correction of recorded audio, enabling vocal tuning and rhythmic adjustments. The powerful sample editor provides tools for cutting, pasting, and manipulating audio waveforms, while various effects plugins offer a wide range of creative possibilities. For instance, users can employ noise reduction tools to clean up recordings, apply EQ and compression to shape the sound, and use reverb and delay to create a sense of space and depth.
These tools are essential for tasks ranging from simple audio cleanup to complex sound design. Consider the process of recording a vocal track: VariAudio can correct pitch inaccuracies and timing inconsistencies, while EQ can shape the vocal tone and remove unwanted frequencies. This refined vocal track can then be further processed with effects like reverb to create a more immersive listening experience.
Comparison with Other DAWs
Okay, so we’ve covered the history, features, and functionality of Cubase. Now let’s dive into how it stacks up against some of its biggest competitors. This isn’t about declaring a “winner,” but rather highlighting the strengths and weaknesses of each DAW to help you choose the right tool for your musical journey.
Cubase vs. Ableton Live
Choosing between Cubase and Ableton Live often boils down to your preferred workflow and musical style. Cubase is a powerhouse for traditional composition and production, while Ableton excels in live performance and electronic music creation. The following table summarizes key differences:
| Feature | Cubase | Ableton Live |
|---|---|---|
| Primary Focus | Traditional composition and multi-track recording | Live performance, electronic music production, and loop-based workflows |
| Workflow | Linear, project-based arrangement | Session view (flexible arrangement) and Arrangement view (linear arrangement) |
| MIDI Editing | Extensive and highly customizable MIDI editor with powerful tools | Strong MIDI capabilities, but potentially less in-depth than Cubase |
| Audio Editing | Advanced audio editing tools, including powerful warping and time-stretching | Good audio editing capabilities, with emphasis on real-time manipulation |
| Sampling & Looping | Powerful sampling capabilities, but not as central to the workflow as in Ableton | Built-in sampling and looping features are core to its functionality |
| Plugin Integration | Excellent VST support, offering a massive library of plugins | Strong VST support, with a focus on its own Max for Live plugin environment |
| Price | Generally more expensive | Offers various licensing options, including a more affordable “Lite” version |
Cubase vs. Logic Pro X Workflow Differences
Cubase and Logic Pro X, while both powerful DAWs, offer distinct workflows. Cubase tends towards a more traditional, linear approach to arranging music. You lay down tracks sequentially, much like working with a multitrack tape recorder. Logic Pro X, while capable of this linear approach, also embraces a more flexible approach with its environment and features like Flex Time and Flex Pitch.
These features allow for more fluid and non-destructive editing, particularly useful for working with existing audio recordings. The key difference lies in the level of immediate manipulation offered. Logic’s intuitive drag-and-drop functionality and quick access to editing tools often make it feel faster for certain tasks, while Cubase’s depth of options may require more time investment to master, ultimately leading to greater precision.
Target User Groups: Cubase vs. Pro Tools
Cubase’s extensive feature set and deep customization options make it ideal for professional composers, sound designers, and producers who require a highly versatile and powerful DAW. Its strength lies in its meticulous control and ability to handle complex projects. Pro Tools, on the other hand, maintains a strong presence in professional audio post-production, particularly in film and television scoring and sound design.
Its strengths lie in its industry-standard status, extensive integration with professional hardware, and its robust features for handling large, complex audio projects. Think of it this way: Cubase is the Swiss Army knife of DAWs, while Pro Tools is the specialized tool favored by a specific industry.
Advanced Features and Techniques
Cubase offers a powerful suite of advanced tools that can significantly elevate your music production workflow. Beyond the basics, features like VariAudio, Chord Tracks, and sophisticated automation unlock creative possibilities previously unimaginable. Mastering these tools transforms Cubase from a DAW into a highly customizable and expressive instrument.
VariAudio and Pitch Correction
VariAudio is Cubase’s built-in, real-time pitch correction and editing tool. It allows for incredibly precise manipulation of vocal melodies and timing, letting you correct pitch inaccuracies, add vibrato, or even completely reshape a vocal performance. The process begins by importing your vocal track. Then, VariAudio analyzes the audio, creating a visual representation of the notes. Individual notes can then be selected, moved, stretched, or altered in pitch.
This level of control offers unparalleled flexibility for refining vocal performances, creating unique vocal effects, and even completely changing the character of a vocal line. For instance, you could subtly correct a slightly off-pitch note, or drastically alter the melody to create a completely new song section. The real-time nature of VariAudio means that changes are immediately audible, making the editing process intuitive and efficient.
Chord Tracks and Harmonic Manipulation
Cubase’s Chord Tracks provide a powerful way to visualize and manipulate the harmonic structure of your music. Instead of dealing with individual notes, you work with chords, making it easier to create and edit chord progressions, generate harmonies, and experiment with different harmonic structures. You can input chords using a variety of methods, including MIDI keyboard, mouse input, or by importing chord symbols from a notation program.
Once entered, the Chord Track interacts with other parts of Cubase, such as the VST Instruments, to automatically generate chord voicings, arpeggios, and other harmonic content. This simplifies complex harmonic arrangements and opens up possibilities for exploring different harmonic ideas without needing extensive MIDI editing. Imagine quickly changing the key of an entire song section with a few simple adjustments to the Chord Track – that’s the power of this feature.
Automation and Dynamic Mixing
Cubase’s automation system allows for precise control over virtually any parameter within the software, enabling the creation of dynamic and evolving mixes. This isn’t just about simple volume fades; you can automate pan position, EQ settings, effects parameters, and much more. The process usually begins by selecting the parameter you want to automate on a specific track. Then, using the automation lanes, you can draw in automation curves that define how the parameter changes over time.
This allows for subtle shifts in the mix, or dramatic changes, creating movement and interest. For example, you might automate the reverb send on a vocal to create a more spacious sound during the chorus, or automate EQ frequencies to shape the tone of an instrument throughout a song. The possibilities are truly limitless, allowing for a level of sonic detail and control far beyond static mixing.
Advanced Mixing Techniques in Cubase
Implementing advanced mixing techniques within Cubase involves leveraging its powerful tools and features in a strategic manner. This includes employing techniques such as parallel processing, using dynamic EQ, and mastering the art of bussing. Parallel processing involves sending a signal to multiple instances of the same effect with different settings and then blending the results, creating richer and more complex sounds.
Dynamic EQ allows for automated adjustment of EQ frequencies based on the input signal’s level, providing precise control over dynamics and frequency balance. Bussing involves grouping tracks together and processing them as a single unit, allowing for efficient processing and cohesive sound design. These techniques, when combined with careful attention to gain staging and phase alignment, allow for the creation of professional-sounding mixes.
The key is to experiment and discover which techniques best suit your individual style and the specific characteristics of your tracks.
Plugin Integration and Management
Cubase’s robust VST plugin integration is a major selling point for many producers and composers. It seamlessly handles a wide range of plugins, from simple EQs and compressors to complex synthesizers and samplers, allowing for incredible flexibility in sound design and mixing. Understanding how to effectively manage this vast potential is key to maximizing your workflow efficiency.The integration itself is fairly straightforward.
Cubase utilizes a standardized VST (Virtual Studio Technology) format, meaning most plugins designed for this format will work seamlessly within the DAW. You simply locate the plugin in your file system, scan for it within Cubase, and then drag and drop it onto your tracks. This ease of integration allows for a truly modular approach to music production.
Recommended Plugins by Genre
Choosing the right plugins can significantly impact your sound. The following list offers suggestions categorized by genre, although many plugins transcend genre boundaries and can be used creatively across various styles.
- Electronic Music: Massive X (Native Instruments)
-a powerful and versatile synthesizer known for its extensive sound design capabilities; Serum (Xfer Records)
-another widely-used wavetable synthesizer; FabFilter Pro-Q 3 – a highly regarded equalizer; ValhallaRoom – a reverb plugin offering a wide range of realistic and creative spaces. - Hip-Hop: Waves plugins (various)
-Waves offers a comprehensive suite of plugins covering compression, EQ, and effects, many of which are industry standards; Soundtoys plugins (various)
-known for their creative and characterful effects; Output Arcade – a sample library and sampler that provides a massive amount of loops and sounds for hip-hop production. - Orchestral: Spitfire Audio libraries (various)
-offer incredibly realistic orchestral samples; Vienna Instruments (Vienna Symphonic Library)
-another popular choice for high-quality orchestral sounds; EastWest Hollywood series – known for its vast and detailed orchestral samples; Kontakt (Native Instruments)
-a powerful sampler that can load many third-party orchestral libraries.
Managing a Large VST Plugin Library
Managing a large VST library can quickly become overwhelming. A well-organized library is crucial for efficient workflow. Cubase offers some built-in tools for plugin management, but utilizing external organizational strategies can significantly improve your experience. Consider creating a dedicated folder structure for your plugins, categorizing them by type (synthesizers, effects, etc.) and perhaps even sub-categorizing by manufacturer or specific sound characteristics.
Regularly auditing your plugin collection, removing unused or outdated plugins, can also help keep things manageable. Some users even employ dedicated plugin managers, which can offer advanced features such as batch scanning and tagging. Regularly backing up your plugin library is also essential to prevent data loss.
Workflow and Best Practices
Okay, so you’ve got your intro and outro ready, you’ve covered the history, features, and comparisons – now let’s talk about actuallyusing* Cubase effectively. This section dives into practical workflows and strategies to keep your projects organized and running smoothly, even when they get massive. Think of this as your survival guide for navigating the Cubase jungle.
Efficient workflow in Cubase is all about preventing headaches down the line. A well-organized project is a happy project, and a happy project translates to a less stressful production process. This means proactively thinking about how you structure your sessions, manage your audio files, and troubleshoot potential problems.
Project Organization Strategies
The key to a smoothly running Cubase project lies in a well-defined organizational structure. Think of it like building a house – you wouldn’t just start throwing bricks together, right? You’d have blueprints and a plan. The same principle applies to your Cubase sessions. Consistent naming conventions are crucial.
Instead of “track1.wav,” use descriptive names like “kick_final.wav” or “leadvocal_take3.wav.” This simple change drastically improves clarity and searchability. Using folders within the project to group related tracks (e.g., drums, vocals, synths) is also essential for managing complexity. For very large projects, consider using color-coding for visual organization of tracks and groups. Imagine a rainbow of tracks – much easier to visually navigate than a sea of gray.
Efficient Audio File Management, Cubase
Managing audio files in large Cubase projects can quickly become a nightmare if not handled properly. Here’s how to avoid that audio file apocalypse. First, establish a clear file naming convention, as mentioned before. Second, create a dedicated project folder containing all related audio files, MIDI files, and project files. This keeps everything neatly contained.
Third, consider using a dedicated hard drive for your audio projects, preferably an SSD for faster loading times. Fourth, regularly consolidate and archive your project files. Cubase offers features to consolidate files, embedding them into the project file. This makes it easier to share your projects and avoids issues with missing files.
Preventing and Resolving Common Project Issues
Even with the best organization, things can still go wrong. Knowing how to anticipate and resolve common problems will save you countless hours of frustration. One frequent issue is audio latency. This is the delay between when you play a note and when you hear it. Adjusting your buffer size in Cubase’s audio settings can often resolve this.
Another common problem is audio crackles or dropouts. These are often caused by insufficient processing power or buffer underruns. Checking your audio driver settings and ensuring your computer meets the minimum system requirements for Cubase can help. Regularly saving your work (auto-save is your friend!) prevents data loss in case of crashes. And finally, if you encounter a corrupted project, try opening a backup copy if you have one.
If all else fails, don’t panic; reach out to the Cubase community forums – there’s a helpful bunch ready to assist.
Cubase’s Role in Music Production
Cubase, a veteran Digital Audio Workstation (DAW), has played a significant role in shaping the modern music production landscape. Its longevity and robust feature set have made it a go-to choice for professionals across a wide range of genres, contributing to countless commercially successful recordings. Its impact extends beyond simply providing tools; it’s influenced workflow, creative processes, and the overall sound of modern music.Cubase’s versatility and powerful features have allowed it to be adopted across numerous genres.
It’s not tied to a single style, showcasing its adaptability and broad appeal to producers with diverse musical tastes.
Genres Predominantly Using Cubase
Cubase’s user-friendly interface and extensive feature set have made it a popular choice for a diverse range of genres. Its capabilities cater to both electronic and acoustic music production, highlighting its adaptability.
Cubase is my go-to DAW, but I’ve had some serious crashes lately, so I’m thinking my system needs a tune-up. Before I dive into reinstalling everything, I figured I should probably grab a free antivirus for windows 10 to make sure there’s no malware causing the issues. Hopefully, a quick scan will get Cubase running smoothly again!
From the intricate arrangements of orchestral scores to the complex layering of electronic dance music, Cubase has proven itself a versatile tool. It’s equally at home in genres like pop, rock, hip-hop, jazz, and classical music, proving its adaptability to diverse creative needs. Its advanced features, such as sophisticated MIDI editing capabilities and a wide range of built-in effects, appeal to producers seeking precise control over their projects.
Examples of Famous Songs or Albums Produced Using Cubase
While specific DAW information isn’t always publicly available for every project, Cubase’s extensive use within the industry is well-documented. Many high-profile artists and producers have relied on its capabilities to create some of the most recognizable music in the world.
While definitive confirmation on specific software used for every project can be difficult to obtain, the prevalence of Cubase in professional studios points to its involvement in countless commercially successful releases. The software’s reputation for reliability and high-quality audio processing has made it a favorite among seasoned professionals. The sheer volume of music created using Cubase speaks volumes about its importance in the industry.
Cubase’s Impact on the Music Production Landscape
Cubase’s influence extends beyond its user base. Its innovative features and workflow have helped shape the standards for modern DAWs, influencing the development of competing software and setting benchmarks for industry best practices.
The introduction of features like its powerful MIDI editor, advanced automation capabilities, and its sophisticated audio editing tools have set new standards in music production. Its intuitive interface, combined with its powerful features, has made professional-quality music production more accessible to a wider range of users. This democratization of music production, in part thanks to Cubase, has broadened creative possibilities and contributed to a more diverse musical landscape.
System Requirements and Optimization
Getting Cubase to run smoothly depends heavily on your system’s specs. A powerful machine will yield a better experience, especially when working with large projects and complex plugins. Understanding both the minimum and recommended requirements, along with some optimization techniques, is key to a frustration-free workflow.Knowing your system’s capabilities is crucial for a smooth Cubase experience. Insufficient RAM, for example, can lead to constant stuttering and crashes, while a weak processor will struggle to handle complex audio processing.
Similarly, a slow hard drive (especially if you’re using it for your project files) can severely impact performance.
Minimum System Requirements
These are the bare minimum specs to run Cubase, but expect a less-than-ideal experience, especially with larger projects. You’ll likely experience noticeable latency and potential crashes. Think of this as the “survival mode” specs.
- Operating System: Windows 10 or macOS 10.15 (or later versions)
- Processor: Intel Core i5 or AMD Ryzen 5 equivalent (or better)
- RAM: 8 GB (though 16GB is highly recommended)
- Hard Drive Space: 20 GB of free space (but significantly more is needed for projects)
- Audio Interface: A decent audio interface is strongly recommended for professional results, even at minimum specs.
Recommended System Requirements
These specs will provide a much smoother and more efficient workflow, even with demanding projects. You’ll be able to handle more tracks, plugins, and effects without significant performance issues. Consider this the “comfort zone” for your Cubase setup.
- Operating System: Windows 11 or macOS 12 (or later versions)
- Processor: Intel Core i7 or AMD Ryzen 7 equivalent (or better)
- RAM: 16 GB (32 GB is recommended for larger projects and extensive plugin use)
- Hard Drive Space: A solid-state drive (SSD) with at least 100 GB of free space (consider a larger SSD for more substantial projects)
- Audio Interface: A high-quality audio interface with low latency drivers is crucial for professional use.
Optimizing Cubase Performance
Several strategies can significantly improve Cubase’s performance. These are not mutually exclusive and should be implemented as needed, depending on your setup and workflow.
- Use an SSD: Switching to a solid-state drive (SSD) for your operating system and project files will drastically reduce load times and improve overall responsiveness. The difference between an HDD and an SSD is night and day in this context.
- Manage RAM Usage: Close unnecessary applications and background processes while working in Cubase. Monitor your RAM usage and adjust accordingly. Cubase is a resource-intensive application.
- Reduce Buffer Size (with caution): Lowering the buffer size can reduce latency, but it can also increase CPU load, potentially leading to dropouts. Experiment to find the optimal balance for your system. Start high and slowly decrease it until you notice audio issues.
- Use Sample Rate and Bit Depth Appropriately: Higher sample rates and bit depths offer better audio quality, but they also demand more processing power. Use 44.1 kHz/16-bit unless higher quality is absolutely necessary.
- Consolidate and Freeze Tracks: Consolidating audio tracks renders them into a single file, reducing CPU load. Freezing tracks renders them to audio, freeing up processing power from plugins.
Troubleshooting Common Performance Issues
Performance issues can manifest in various ways, from audio dropouts to freezing. Here are some common issues and solutions.
- Audio Dropouts/Glitches: This often indicates insufficient processing power or buffer size issues. Try increasing the buffer size, closing unnecessary applications, or upgrading your system’s hardware.
- High CPU/RAM Usage: This points to too many plugins, tracks, or processes running simultaneously. Freeze or consolidate tracks, close unnecessary applications, or consider upgrading your system’s RAM.
- Cubase Freezing/Crashing: This can be due to various factors, including corrupted project files, driver conflicts, or insufficient system resources. Try saving your project, restarting Cubase, updating drivers, and checking for system errors.
- Slow Loading Times: This usually stems from using a hard disk drive (HDD) instead of a solid-state drive (SSD). Switching to an SSD is highly recommended.
The Future of Cubase
Cubase, a veteran in the Digital Audio Workstation (DAW) arena, has consistently adapted to technological advancements. Its future hinges on maintaining this adaptability while innovating to meet the evolving needs of modern music production. We can expect to see further refinement of existing features, alongside the integration of cutting-edge technologies that promise to reshape the creative landscape.
The trajectory of Cubase’s development will likely be influenced by several key factors, including the growing prevalence of AI in music creation, the ongoing evolution of virtual reality and augmented reality (VR/AR) technologies, and the increasing demand for seamless collaboration tools within DAWs. These technological shifts present both challenges and opportunities for Steinberg, the company behind Cubase.
AI-Powered Features in Cubase
The integration of Artificial Intelligence (AI) is poised to revolutionize numerous aspects of music production. We can anticipate Cubase incorporating AI-driven features such as intelligent arrangement suggestions, automated mixing and mastering tools, and even AI-powered composition assistance. For instance, imagine a feature that analyzes your musical style and suggests appropriate chord progressions or rhythmic patterns, acting as a sophisticated creative partner.
Similar to how Adobe Photoshop uses AI for image enhancement, Cubase could leverage AI to intelligently clean up audio recordings, reduce noise, and even enhance the overall sonic quality. This would drastically reduce the time and expertise needed for tasks like audio restoration and cleanup.
Enhanced VR/AR Integration
The potential of VR/AR in music production is vast, and Cubase could become a key player in this emerging field. Imagine a future where musicians can interact with virtual instruments and effects in a fully immersive 3D environment. This could involve creating virtual studios within VR, allowing for a more intuitive and engaging workflow. While current VR applications in music are still in their nascent stages, the future could see Cubase offering a seamless integration with VR/AR headsets and controllers, opening up new creative avenues for musicians.
For example, users might be able to manipulate virtual synthesizers using hand gestures or compose music by arranging virtual instruments in a three-dimensional space.
Improved Collaboration and Cloud Integration
Real-time collaboration is becoming increasingly important in music production. Future versions of Cubase could offer significantly enhanced collaborative features, allowing multiple users to work on a project simultaneously from different locations. This could involve seamless integration with cloud storage services, enabling effortless file sharing and version control. This is akin to how Google Docs allows real-time collaborative editing; Cubase could implement a similar system, enabling producers and musicians to collaborate efficiently on projects regardless of their geographical location.
This would improve workflow and facilitate creative exchange in ways currently not possible.
Streamlined Workflow and User Interface Enhancements
While powerful, Cubase’s interface can sometimes feel overwhelming to new users. Future updates could focus on streamlining the workflow and making the user interface more intuitive. This might involve the implementation of customizable workspaces, AI-powered automation, and improved keyboard shortcuts to expedite the creative process. Consider the example of Logic Pro X’s user interface evolution; Cubase could draw inspiration from such designs to enhance user experience and efficiency.
Final Summary
From its groundbreaking early versions to its current state-of-the-art capabilities, Cubase remains a cornerstone of the music production world. Its adaptable workflow, extensive feature set, and robust plugin integration make it a compelling choice for musicians of all skill levels and genres. Whether you’re a seasoned professional or just starting your musical journey, understanding Cubase’s power and versatility is key to unlocking your creative potential.
This exploration has only scratched the surface; the true mastery of Cubase comes through hands-on experience and a continued pursuit of its many capabilities. So, fire up Cubase, and let the music begin!
Quick FAQs: Cubase
What’s the difference between Cubase Elements and Cubase Pro?
Cubase Elements is a more streamlined version with fewer features, ideal for beginners. Cubase Pro offers a much broader range of advanced tools and features for professional users.
Can Cubase handle large, complex projects?
Yes, Cubase is designed to handle very large and complex projects, but efficient project organization and audio file management are crucial for optimal performance.
Is Cubase good for beginners?
While it has a steeper learning curve than some DAWs, Cubase offers excellent tutorials and resources to help beginners get started. Cubase Elements is a good starting point.
Does Cubase support all VST plugins?
Cubase supports a vast majority of VST plugins, but compatibility can vary. Always check plugin specifications before purchasing.
How much does Cubase cost?
The cost varies depending on the version (Elements, Artist, Pro). Check Steinberg’s website for the most up-to-date pricing.